Saturday, September 29, 2007

Red screen of death?

Red screen of death?

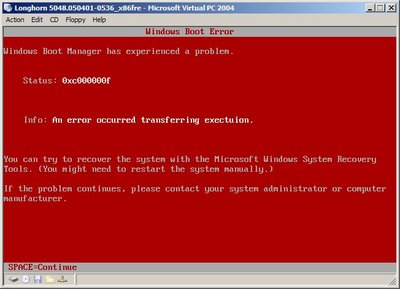
Microsoft has come up with a unique solution to the legendary 'blue screen of death' in the next version of its Windows operating system. With the release of Longhorn, the Redmond behemoth has added a red screen to face users when their system crashes.
According to Microsoft techie and blogger Michael Kaplan, who has been experimenting with a Longhorn beta, as well as being confronted with the blue screen of death, now users will also see red.

The red screen of death appears to be the bigger, badder cousin to the traditional blue screen and is designed to let users know that a more serious error has occurred, Kaplan said.

It's unlikely that the problem will affect many users of the next generation operating system. Kaplin, Microsoft's technical lead for globalisation infrastructure, fonts and tools, said that he had only achieved the red screen of death by making a "small set-up change" and altering the registry.

This "somewhat destructive act", said Kaplin, provoked a red screen of death after he rebooted Longhorn's virtual image, where previous versions of Windows returned a black screen with a different error message following the same treatment.

"I am not sure I would class the change as an improvement," Kaplin said.


Friday, September 28, 2007

USB Blocking in Windows Vista Release Candidate 1

USB Blocking in Windows Vista Release Candidate 1
One of the favorite enterprise features of Microsoft® Windows Vista™, USB device installations, gets even better in RC1. You may have heard stories of some IT departments going so far as to pour glue in USB ports in an attempt comply with data protection regulations, by preventing users from copying sensitive information onto external storage devices—or to protect from malicious software that could be on the device. In Windows Vista there’s a better, less messy way. You can use group policy to control what types of devices users can and cannot install. What makes it better in Windows Vista RC1 is that you can now display a custom error message to the user explaining why their device will not install, so they don't have to call the help desk.

Here’s how you set up the policy to do this.

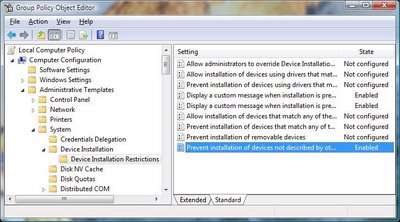
First, you need to configure the policy to block all devices. This policy is located under Computer Configuration Administrative Templates System Device Installation Device Install Restrictions. Set the Prevent installation of devices not described by other policy setting to Enabled.

With this policy set, the user will be blocked from installing any new devices. Now that you have blocked all new devices, you can go back and use the other settings to block certain devices and allow others. With the right configuration, you can prevent data from inappropriately being put on this device while still using it for Windows ReadyBoost. (Note: If you are following along, you will not be able to block a device that has already been installed on the PC before. You will either have to try a different device, or remove the previous device from device manager.)

The next step is to set the custom message that the users will see. You can do this by configuring the “Display a custom error message...” settings.

This is just one of the many data protection features in Windows Vista including BitLocker™ Drive Encryption and improvements in EFS.

Thursday, September 27, 2007

Reset Administrator's Password of Windows NT/2000/XP/2003

Reset Administrator's Password of Windows NT/2000/XP/2003

This article is about how you can reset your windows administrator's password. This article is only for the educational purpose and it should not be used for criminal or miscellaneous activities. These softwares really work however i dont take any responsiblity for any harm caused by these softwares. So use them at your own risk. But these methods works 100%.

EBCD – Emergency Boot CD

Download EBCD

EBCD is a bootable CD, intended for system recovery in the case of software or hardware faults. It is able to create backup copies of normally working system and restore system to saved state. It contains the best system software ever created, properly compiled and configured for the maximum efficient use. The most interesting part is that its FREE.


EBCD will be very useful when you need to:


  • Copy/move files (with long names, not necessary in CP437 encoding) from/to the disk but OS which can handle them (windows, Linux...) cannot boot. In particular, you may create a backup copy of normally installed and configured Windows and later restore Windows from such backup copy. So, in the case of fault OS itself and all software and its settings can be restored in 5-10 minutes.


  • Perform emergency boot of Windows NT / 2000 / XP. When the loader of this OS on the hard disk is damaged or misconfigured, you are able to load OS using another, standalone loader from this CD.


  • Recover master boot record of HDD. This allows to boot OS after incorrect uninstallation of custom loader (LILO, for example), which made all OS on your PC not bootable.


  • Delete, move, copy to file (image) and re-create partition from file. Image transfer over network is also supported: so you may configure one PC and then make contents of hard disks of other PCs same as contents of the hard disk of the first one.


  • Change password of any user, including administrator of Windows NT/2000/XP OS. You do not need to know the old password.


  • Recover deleted file, even file re-deleted from Windows Recycle Bin, and, in contrast, wipe single file or a whole disk so that it will be impossible to recover it in any way.


  • Recover data from accidentally formatted disk. Sometimes it helps to recover data from the disk, damaged by a virus.


  • Recover data from a floppy disk, which is not readable by OS. Format 3.5" disk for 1.7 Mb size.


Also the disk includes full set of external DOS commands, console versions of the most popular archivers/compressors.

Moreover, emergency boot CD includes minimal Linux distribution (Rescue Linux distribution) which may be very useful to a professional user.

Download EBCD


Windows Password recovery

http://www.loginrecovery.com

This site provides a tool to recover lost Windows XP passwords. It works for administrator and user accounts, it doesn't change the password just tells you the old one. It works with encrypted files (EFS) and password hashes. It even works if no passwords at all are known for the machine (as long as you have another computer with internet access to view this website with).

Author claims it also works with Windows NT and Windows Server 2003 and Windows Longhorn, but the BEST thing about it is the fact that it won't reset your passwords, but simply reveal them for you to remember and then use.

Give it a try. The author would like to receive feedback. There is a free service as well as a priority service that will retrieve your passwords within minutes. The fee for the priority service is very cheap, and is really just to cover server costs.

Usage, instructions and additional information can be found at

http://www.loginrecovery.com


Free Website Directory
Windows Vista’s New and Improved Remote Assistance

This article shows what you can expect from the new version of Remote Assistance.
When Microsoft released Windows XP, it contained a lot of features that weren’t found in previous versions of the Windows operating system. One of the best new features in Windows XP was Remote Assistance. Remote Assistance relieved a company’s support staff from having to physically travel to each computer that had a problem, and greatly reduced the amount of time required for telephone support. As great as Remote Assistance is however, it does have its shortcomings. There are some network configurations that it just doesn’t work with, and it can be considered as somewhat of a security risk. In Windows Vista, Microsoft has completely revamped the Remote Assistance feature. In this article, I will show you what you can expect from the new version of Remote Assistance.

Efficiency Improvements
One way that Remote Assistance has been improved is that it is designed to be more efficient. The Windows XP version of Remote Assistance tended to be difficult to use in low bandwidth situations. As such, the Windows Vista version of Remote Assistance has been re-engineered to use less bandwidth. In doing so however, one feature was removed. In the Windows XP version of Remote Assistance, it was possible to verbally communicate with the person that you were helping. The verbal communications feature has been removed from the Windows Vista version of Remote Assistance in order to conserve bandwidth.

Compatibility
This brings up an interesting point about compatibility. Most organizations probably aren’t going to switch all of their users to Vista overnight, so you might be wondering about whether or not the Vista version of Remote Assistance is compatible with the Windows XP version. The two versions are mostly compatible, but there are a few minor issues (including the verbal communications issue that I just mentioned).

One issue is that Vista’s version of Remote Assistance supports pausing a session. Since the Windows XP version didn’t support this feature, someone who is using Vista to assist someone running Windows XP can pause the session, but the person who is running Windows XP will not be notified that the session has been paused.

A more important issue is that a person who is running Windows Vista will not be able to offer assistance to someone who is running Windows XP. Therefore, if your organization’s help desk depends on Remote Assistance, then you will probably want to make sure that the help desk staff are the last ones upgraded to Windows Vista.

Using Remote Assistance
Establishing a Remote Assistance session through Windows Vista is simple. As you may recall, in Windows XP, Remote Assistance was part of the Help and Support Center. In Vista, Remote Assistance has been made into a stand alone application. You can access Remote Assistance by clicking the Start button and selecting All Programs Maintenance Remote Assistance. Upon launching Remote Assistance, you will see a screen giving you the choice of either inviting someone to help you or offering to help someone, as shown in Figure A.

Figure A: Upon launching Remote Assistance, you will see a screen giving you the choice of either inviting someone to help you or offering to help someone

If the person who is running Remote Assistance is the one who needs help, they would select the Invite Someone You Trust To Help You option. At this point, the person who is asking for help would see a screen asking if they want to use e-mail to send an invitation, or if they would like to save the invitation as a file.

This particular part of the process probably seems very similar to the Windows XP version at first glance. There is one very important difference though. In Windows XP, you could e-mail an invitation to someone, or you could save the invitation to a file and give it to the recipient some other way. However, just because the recipient had an invitation, it did not necessarily mean that they could connect to the person who needed help. Both machines either had to have publicly accessible IP addresses, or they had to be a part of the same network. In Windows Vista however, Remote Assistance now supports NAT traversal. This means that if one of the users involved in the Remote Assistance session happens to be behind a NAT firewall, the session can still be established, so long as the necessary firewall ports are open.

When the person who needs help creates the invitation, they are prompted to assign a password to the invitation (six character minimum). After doing so, the invitation goes out, and the user’s machine opens a window similar to the one that’s shown in Figure B, and begins waiting for a connection.

Figure B: This is the Remote Assistance window that is displayed on the computer of the person who asked for help

The recipient of the invitation then opens the invitation and is prompted to enter the password that was assigned to the invitation by the user who is asking for help. Simply entering the password does not establish a full blown Remote Assistance session though. The person who sent the invitation will see a pop up message asking if it is OK for the Remote Access session to being. This prevents an administrator from establishing a session without the user’s knowledge.
The dialog box shown in Figure B remains present throughout the Remote Access session. As you can see in the figure, there are a couple of new capabilities. The parties involved in a Remote Administration session can now pause a session, chat, or transfer a file. Another thing worth noting is that even after a Remote Assistance session has been established, the helper can not control the user’s PC unless the user gives them permission to do so. The helper’s console looks similar to the one shown in Figure B, but they also have a Request Control icon. If the helper clicks this icon, the user requesting assistance has to respond to a prompt in order to hand over control of their machine.

Overall there are a lot of impovements coming in Windows Vista. Goto Microsoft website for more information www.microsoft.com

Cool Yahoo Messenger Commands

Cool Yahoo Messenger Commands

Hi again. Some times yahoo server goes down and everyone whos chatting just tear their heads
off. Lot of guys cant even change their chatrooms. Or if u want to know the chatroom of a person u want to follow then i got just some special gift for you. Here is a list of commands that could be executed in a yahoo chat room.

/help calls up the help file
/cls clears the screen
/save saves the current chat session transcript
/leave exits current room
/join roomname joins roomname
/goto username joins the chat room that username is currently in
/follow username user will follows username whenever the user changes rooms
/think text posts text in this format "oO(text)"
/tell username text -- allows you to send a text to username with opening a window
/invite username invites username to the current room
/webcam starts your webcam
/version displays the program version
/version username sends the program version to username
/time shows the time
/roll number rolls the number of dice
/logoff closes the client
/ignore add username will add username to your ignore list
/ignore remove username will remove username from your ignore list :Text formats the text as an emotion